Getting Started With Serverless Framework

I am a Lead Engineer from India. Love to blog about serverless and help teams design and develop serverless architecture. An AWS cloud practitioner. Blogs about AWS Services utilising AWS CDK, CloudFormation, Terraform.
A serverless framework is an open-source tool used for developing and deploying serverless applications. It is a vendor-neutral framework as it can be used with AWS, Azure, or GCP. It provides a fully serverless application lifecycle management.
Install the serverless CLI
Install the Serverless CLI using npm as shown below. This will install serverless CLI globally.
npm install -g serverless
Configure AWS credentials
Configure the serverless with AWS credentials using the below command. The provider is AWS and we need to set the access key and secret key.
serverless config credential --provider aws --key fakeaccesskey --secret fakesecretkey
Install serverless-localstack plugin
This plugin is required to run serverless to support running against the local stack. This plugin allows Serverless applications to be deployed and tested on your local machine. Any requests to AWS to be redirected to a running LocalStack instance.
npm install --save-dev serverless-localstack
Create a new serverless project
Serverless provides various templates which we can use to get a headstart. To see a list of available templates run the below command.
npm serverless create --help
Let us select the aws-nodejs as shown below
serverless create --template aws-nodejs
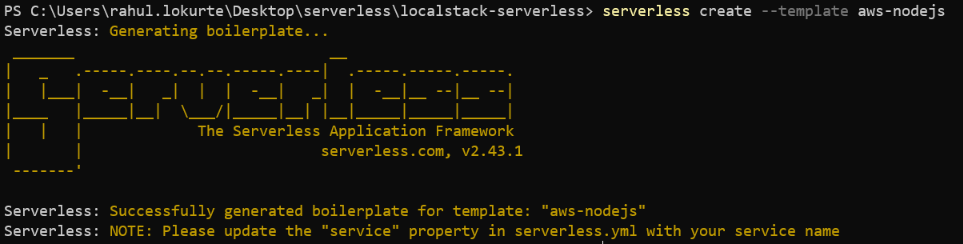
Once the project is created successfully, you will see the below code.
- handler.js
"use strict";

module.exports.hello = async (event) => {
  return {
    statusCode: 200,
    body: JSON.stringify(
      {
        message: "Go Serverless v1.0! Your function executed successfully!",
        input: event,
      },
      null,
      2
    ),
  };

  // Use this code if you don't use the http event with the LAMBDA-PROXY integration
  // return { message: 'Go Serverless v1.0! Your function executed successfully!', event };
};
- serverless.yml
service: localstack-serverless
frameworkVersion: "2"

provider:
  name: aws
  runtime: nodejs12.x
  lambdaHashingVersion: 20201221

functions:
  hello:
    handler: handler.hello
Let us now update the serverless.yml file to include the LocalStack plugin as shown below.
service: localstack-serverless
plugins:
  - serverless-localstack

custom:
  localstack:
    debug: true
    stages:
      - local
      - development
    endpointFile: endpoints.json
frameworkVersion: "2"

provider:
  name: aws
  runtime: nodejs14.x
  lambdaHashingVersion: 20201221

functions:
  hello:
    handler: handler.hello
We have added the development and local stage and also we are pointing to endpoints.json which is defined as below.
endpoint.json
{
  "CloudFormation": "http://localhost:4566",
  "CloudWatch": "http://localhost:4566",
  "Lambda": "http://localhost:4566",
  "S3": "http://localhost:4566",
  "APIGateway": "http://localhost:4566",
  "Route53": "http://localhost:4566"
}
We can add the gateway events in the serverless.yml file as shown below. It has an GET endpoint with the path as hello
functions:
  hello:
    handler: handler.hello
    events:
      - http:
          path: hello
          method: get
Now let us deploy using the below command.
serverless deploy --stage local

You can see in the above screenshot, you will see we have deployed the serverless function to LocalStack which returns the endpoints as shown below
endpoints:
  http://localhost:4566/restapis/7133myfcjr/local/_user_request_
To invoke the hello function use the following URL in the Browser
http://localhost:4566/restapis/7133myfcjr/local/_user_request_/hello